|
ERROR!
You must enable Java Script on your browser to navigate this site. |
||
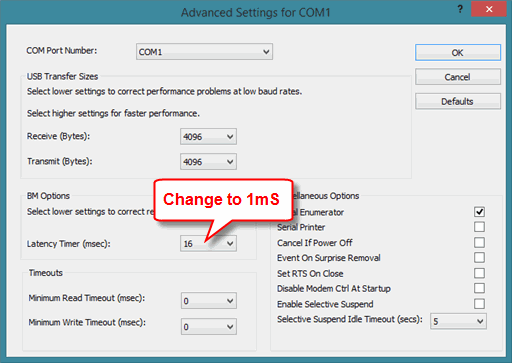
Custom Software DevelopmentIf using ModCom as your host software, it automatically handles all of the critical details of the DAQ Module communications operations in the background, relieving the user of having to be proficient in this subject matter. However, if you are developing your own custom software to communicate with the DAQ Modules, great care must be given to assure that your program conforms to the specifics of the communications protocol. If your program accepts C++ function calls, it is best to use our Transmitting Commands to a DAQ Module:When transmitting OUTPUT commands to a DAQ Module, a very common mistake is to write code that will transmit each of these commands in succession one right after the other only to discover that the DAQ Module fails to accept each command. Here is the reason why. When you write a line of code to transmit a command, your program does not transmit that command immediately. Instead it places those characters into the communications buffer and tells your operating system (OS) to transmit them when it gets a chance. This could be 5mS later or even 20mS later, and will vary depending on the current workload of your OS such as running other programs in the background, processing mouse/keyboard activity, repainting the screen, etc. In the mean time, if you have a subsequent line of code that will transmit a 2nd command, your program simply places the new characters into the buffer right behind the old characters. Then when your OS finally gets around to transmitting, it will transmit both commands in a row. The 1st command will be received successfully by the DAQ Module, but the 2nd command will be transmitted while the DAQ Module is sending back its reception confirmation to the 1st command. So it will be missed entirely. Therefore when each command is transmitted, it is very important to have your program wait for the reception confirmation before attempting to transmit another command. This will not only assure that the previous command was received, but will assure that the DAQ Module is ready to accept another command. You could easily assume that placing a delay in your program after each command transmission would allow the DAQ Module to respond without causing conflicts, but it is not easy to determine the amount of delay required because the latency produced by your OS will be unpredictable and constantly varying. Our C++ routines will automatically handle this transmit/receive pairing in the background so that you can transmit at will without worrying about any timing issues. Reading Data from a DAQ Module:Another reason that it is important to wait for and process the reception confirmation of each command is because those characters will be loaded into the communications buffer at the host and remain there until your program reads it, and this may cause unexpected results. For instance, suppose you transmit an OUTPUT command and fail to take into consideration the reception confirmation which will be coming back. Then later on you transmit a READ command to get data from the module and have your program read the serial port for the results. But the data you get back from the serial port will not be the results of the READ command. Instead, it will be the reception confirmation of the OUTPUT command that was sent earlier. Your host communications buffer is a FIFO type buffer that will hold all of the previous data packets received from the DAQ Module until they are retrieved by your program one by one. So you must read the buffer each and every time you transmit a command to the module so that it remains empty. Here again, our C++ routines will take care of this for you. Communications Speed:If the DAQ Modules are attached to a USB port on a computer, the speed of communications can be improved significantly by changing the COM port's Latency Timer in your computer’s Device Manager. In some cases up to 15mS can be shaved off the delay produced by the COM port when transmitting. Follow the steps below to make this change. Step 1: Go to your computer's Device Manager and open the "Ports (COM & LPT)" folder. Double-click on the COM port which is being used by your software. Step 2: Click on the "Port Settings" tab at the top of the window and then click on the “Advanced” button down near the bottom. Step 3: Change the “Latency Timer” as shown below to 1mS instead of the default setting which is 16mS. Click on OK to save your settings and close out of the box. There is no need to reboot the computer.

|