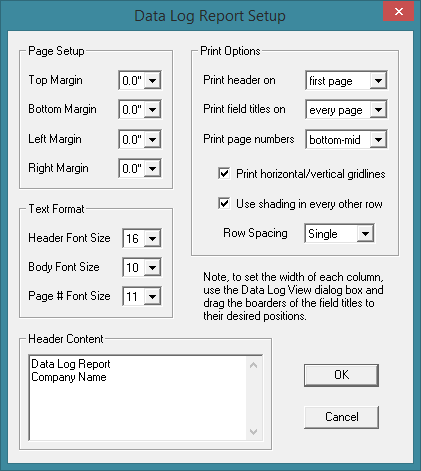
Data Log Report Setup
The data in the log file is stored in a normal ASCII text file format which is comma delimited, other words know as CSV. The first line in the file consists of the field titles. This line along with each log entry is terminated with a carriage-return line-feed pair. The file can be imported into another program such as a Word document or Excel spreadsheet if wishing to lay out a custom report for printing, or a more simpler approach would be to use the generic log report provided by ModCom which is explained here.
In most cases the default selections in this dialog box will work just fine. However, certain layout and printing options can be changed by the user if desired. The following is a summery of the options available in this dialog box:
Properties Dialog Box:

Page Setup:
Top Margin: From the drop-down list at the right, choose the distance from the top of the paper to begin printing the text. Note, some printers can not print at the extreme top of the paper and thus incorporate their own margin. In this case, the margin selected here will be added to the margin provided by the printer.
Bottom Margin: From the drop-down list at the right, choose the distance from the bottom of the paper to end printing of text. Any line of text which falls on or beyond this boundary, will instead be printed on the next page. Note, some printers can not print at the extreme bottom of the paper and thus incorporate their own margin. In this case, the margin selected here will be added to the margin provided by the printer.
Left Margin: From the drop-down list at the right, choose the distance from the left-hand side of the paper to begin printing each line of text. Note, some printers can not print at the extreme left side of the paper and thus incorporate their own margin. In this case, the margin selected here will be added to the margin provided by the printer.
Right Margin: From the drop-down list at the right, choose the distance from the right-hand side of the paper to align the page number if selected to print on the right. Note, some printers can not print at the extreme right side of the paper and thus incorporate their own margin. In this case, the margin selected here will be added to the margin provided by the printer.
Text Format:
Header Font Size: From the drop-down list at the right, choose the font size to be used when printing the header text.
Body Font Size: From the drop-down list at the right, choose the font size to be used when printing the field titles and field data.
Page # Font Size: From the drop-down list at the right, choose the font size to be used when printing the page number.
Header Content: Type in the text to be used for the report header. Each line of this text will automatically be centered between the page margins.
Print Options:
Print header on: From the drop-down list at the right, choose when or if to print the report header.
Print field titles on: From the drop-down list at the right, choose when or if to print the field titles.
Print page numbers: From the drop-down list at the right, choose when or if to print the page numbers.
Print horizontal / vertical gridlines: Check this box to have horizontal and vertical gridlines printed in-between the field titles and field data.
Use shading in every other row: Check this box to print every other row using a light gray background. This option makes it easier to view the report and identify which data fields are common to a particular row.
Row Spacing: From the drop-down list at the right, choose the row spacing to be used when printing the data fields. This is similar to the line spacing used in normal printed text.
|
