|
ERROR!
You must enable Java Script on your browser to navigate this site. |
||
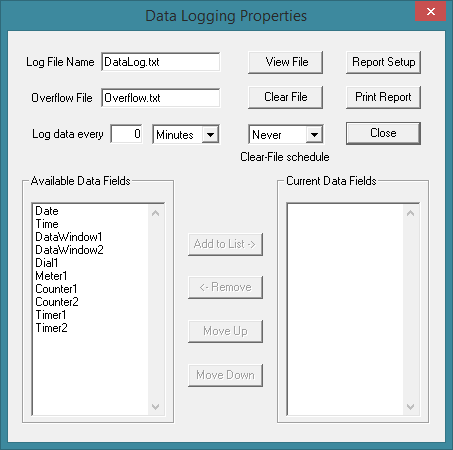
Data LoggingCollecting data and writing it to a file is a very important aspect of any data acquisition software. With ModCom, any To select the Screen Objects to log to file, and to choose the file name and other specifics, click on "Data Logging" in the < Properties Dialog Box: Log File Name: Type in the name of the file that all log data will be written to. If the drive and directory is omitted, the file will be placed in the same drive and directory in which ModCom is currently working. Note, this entry box supports variables. Overflow File: Type in the name of the file to be used when an overflow condition occurs. If the drive and directory is omitted, the file will be placed in the same drive and directory in which ModCom is currently working. This feature is useful when the main log file is located on a disk drive which has limited storage space (such as a floppy disk). If or when the disk containing the log file reaches its maximum storage, ModCom will start writing the data to the overflow file instead, preventing any data from being lost. Note, this entry box supports variables. Log data every: Choose the frequency at which the data will be written to file. Once the Available Data Fields: This box contains a list of all Screen Objects available in the current project which are capable of logging data but have not yet been selected to do so. In addition to the Screen Objects, there are two system fields (data and time) which can be selected for logging. Current Data Fields: This box contains a list of all Screen Objects or system fields which have been selected to be included in the log file. The data field order from top to bottom denotes the order of the fields from left to right as they are written to file. Add to List: To use this option, a data field must first be selected from the "Available Data Fields" list at the left. Click on this button to add the selected data field to the list of fields to be included in the log file. This data field will then be removed from the list at the left and placed in the list at the right. See note below. Remove: To use this option, a data field must first be selected from the "Current Data Fields" list at the right. Click on this button to remove the selected data field from the list of fields to be included in the log file. This data field will then be removed from the list at the right and placed in the list at the left. See note below. Move Up: To use this option, a data field must first be selected from the "Current Data Fields" list at the right. Click on this button to move the selected data field one place up in the listing order, which in turn, denotes the order (left to right) that the fields are written to file. See note below. Move Down: To use this option, a data field must first be selected from the "Current Data Fields" list at the right. Click on this button to move the selected data field one place down in the listing order, which in turn, denotes the order (left to right) that the fields are written to file. See note below. View File: Click on this button to pull up the Data Log View dialog box. Within this box, the full contents of the data log file can be viewed. The field titles will appear across the top of the window and each individual log entry will be shown as a separate row beneath. The width of each field column can be adjusted by dragging on the boarders of the title fields. These settings will be used when printing the log report. Clear File: Click on this button to clear (erase) the old contents from the log file. Clear-File schedule: Use this option to select when the log file should be automatically cleared. "Never" = only when the user presses the Report Setup: Click on this button to pull up the Print Report: Click on this button to print the log report using the current contents of the log file. Note, if changing the field order or contents of the "Current Data Fields" it is recommended that the log file be cleared. This is because the field order of the existing file may not match the new field order specified in this dialog box.
|